Beginners tutorial for how to get started doing data science using servers
In this tutorial we will learn how to install and python and R along with the popular packages. By the end of the tutorial we will be able to upload data to the server and do analysis running on a server and yet still have the interfaces data scientists are used to using on their desktops or laptops. We will do this by uploading a sample data (.csv) file to a server and making visualizations in both R and python. Along the way we will learn how to install custom packages, use virtual environments in python, and finally learn how to run and maintain servers running R and Python. We begin by learning why servers are important and useful for data scientists.
Introduction
When a data scientist is working with a larger set of data which requires more computational resources than their desktop or laptop, they use a more powerful computer called a server. A server is generally a very powerful computer which is dedicated to a specific task (for example running a file system, running a database, doing data analysis, running a web application or even all of the above!).
A server with multiple fast processors and large memory allows you to do analysis which is otherwise not possible on a laptop or desktop. For example if you are dealing with a set of data which is 30 GB, one option for a computer with not enough RAM would be to load the data in a database and database analytics. A faster (and arguably better) option would be use a server with enough ram (more than 30 Gb) and all of the analytics in RAM like is done with smaller sets of data.
Before moving on, lets understand idea of the “the virtual cloud” or a group of virtual private servers. A virtual private server (VPS) is a server which you can rent as a service. Being “virtual” means getting full access and control over the server, but you physically never see the server in person or struggle with managing the hardware. Instead of paying thousands of dollars to buy your own server and having to manage and pay upkeep costs, a virtual machine is running in a data center, but you interact with an emulation though command-line or web tools. Being a service means you can use it when you need it and only pay for when you use the resources. What this means is that when your data gets larger you can temporarily use a VPS to quickly do the analysis required without having ever to purchase a server. This is very powerful since you are able to work with larger and larger sets of data in RAM, without ever having to deal with slower database analysis and overhead. While using servers and VMs can be scary at first we will soon learn how fun, useful and simple they are to use!
There are many options for using using a VPS and companies have specialized options for specific applications. For this guide, we are going to use an example of running a VPS from Digital Ocean, but any instructions should be similar for almost any VPS service provider. Digital Ocean provide a solid state drive only based cloud services. Digital Ocean is highly recommend for new users because it has very simple an intuitive control panel, one click Linux installations, and a very active develop community which have updated tutorials. Digital Ocean has one of one of the lowest costs for hosting. Using this link you can get $10 in credit. Since they have spot pricing, if you pause the server when you are not using it, the credit can last you a very long time! If you are a university student, your school might offer free server access. For University of Waterloo Students, for $2 a term, you can become a member of the computer science club and get access to their servers.
The two most common (open sourced) programming languages for doing data science are python (using the PyDataScience stack) and R. Python is a very easy to learn yet powerful programming language. Many data scientists who also work on production systems or applications use python primarily for analysis. The PyDataScience stack includes SciPy, NumPy, Pandas, Scikitlearn and many more open sourced software libraries. We are soon going to learn that all of these libraries are easy to install using pip or Python Package Index. This means that the development of the packages are contributed and reviewed by hundreds and thousands of people around the world. R is a very powerful mathematical and statistical programming language. Many data scientists who work on the analysis of data use R and is has many statistical packages. R also has its own application development environment which can also be used to build data tools. Similarly to pip, the libraries for the R programming language are packages and maintained in The Comprehensive R Archive Network or CRAN.
The most common IDE/development tool for doing data science in python is Jupyter notebook. Jupyter Notebook is a web application that allows you to create and share documents that contain live code, equations, visualizations and explanatory text. It is very useful as it enables rapid prototyping and reproducible code. Similarly Rstudio is the most common IDE/development tool for doing data science in R, and it offers the ability for notebook like documents using Rmarkdown and even custom web applications using RShiny. Since Jupyter Notebook and Rstudio are web applications using servers, data scientists can use the same tools they are used to using on their desktops with the added computational power of servers.
Goals:
- Connect to a remote server using SSH
- Install python, virtual environments and packages related to data science
- Connect to Jupyter notebook (a python IDE) using a SSH tunnel and do basic data analysis
- Install R and Rstudio
- Connect to Rstudio and do basic data analysis
- Transfer files between and local server and local machine using SSH
- Transfer a data file and plot in Rstudio and Jupyter notebook
Prerequisites:
You must have access to a simple ubuntu linux server with at 1 GB RAM (the more is better). If using digital ocean, you can follow their guide on how to create your first digital ocean virtual server.
How to SSH
In this section we will learn how to connect to a server using SSH. For Linux and Mac we will learn how to use terminal, and for windows we will learn how to use putty.
SSH or Secure Shell is a cryptographic (encrypted) network protocol to allow remote login and other network services to operate securely over an unsecured network. It enables you access your server for log in, file uploading and even conencting to Jupyter notebook or Rstudio.
If you are using a Linux or Mac computer, you can open terminal and follow this guide for setting up ssh for setting up your ssh key and connecting to the server. If you are using Windows you can follow this guide for setting up ssh on windows where you learn how to download and install putty.
As the guide mentioned, it is highly recommended to use an SSH key, but it is also possible to secure shell using a username and password. In general, once SSH is setup, on Mac and Linux you can connect using
ssh server_username@[server.ip.address.here]
For example, with a username of andrew.andrade I can ssh into uWaterloo’s csclub corn-syrup server (located at corn-syrup.uwaterloo.a) by the following command:
ssh andrew.andrade@corn-syrup.uwaterloo.ca
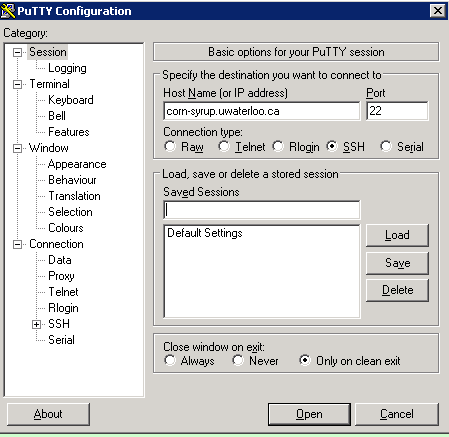
And on Windows you can connect using Putty. As the guide mentioned, you can download the latest version of Putty from here After double clicking to run Putty, you can enter the host name and click open.
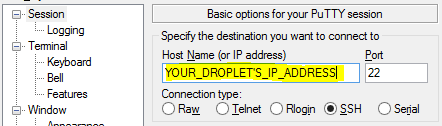
Back to our example, we can connect to corn-syrup by simply entering the URL into putty under the host name and clicking open.
Once you have successfully connected to your server, you should be able to type commands either in the command using terminal (or putty for windows users). Let us first make sure our apt repository index is up to date by typing the following and hitting enter:
sudo apt-get -y update
The following step is optional, but is is recommended to update the system.
sudo apt-get -y upgrade
Next let us install some two build requirements:
sudo apt-get -y install build-essential gfortran
The following are additional build tools which are not required, but are useful when trying to install more libraries in the future.
sudo apt-get -y install build-essential gfortran gcc-multilib g++-multilib libffi-dev libffi6 libffi6-dbg python-crypto python-mox3 python-pil python-ply libssl-dev zlib1g-dev libbz2-dev libexpat1-dev libbluetooth-dev libgdbm-dev dpkg-dev quilt autotools-dev libreadline-dev libtinfo-dev libncursesw5-dev tk-dev blt-dev libssl-dev zlib1g-dev libbz2-dev libexpat1-dev libbluetooth-dev libsqlite3-dev libgpm2 mime-support netbase net-tools bzip2
We are now ready to move onto to install python, R and their corresponding common data science framework.
Python and the Python Data Science Stack
Now that we have our system read we can learn how to install the python data science stack on a remote server. Since the process in involved, we create the guided in its own page. You can follow along the guide then return here once you have completed the instructions.
R and Rstudio
In this section we will learn how install and update R along with installing and managing Rstudio sever.
First we must install R. This guide on digital ocean provides very good instructions on how to install R, but I will just include the highlights here.
Since the default location to install R usually includes older versions, we first need to add an updated version to the advanced package tool’s (APT) list located here: /etc/apt/sources.list. The exact command to use depends on your version of ubuntu but for 14.04 the follow command will work:
sudo sh -c 'echo "deb http://cran.rstudio.com/bin/linux/ubuntu trusty/" >> /etc/apt/sources.list'
Next we need to add the public key of the authencate package
gpg --keyserver keyserver.ubuntu.com --recv-key E084DAB9
Now we can add the key to apt:
gpg -a --export E084DAB9 | sudo apt-key add -
Finally we can update apt and install the R base package:
  sudo apt-get update
  sudo apt-get -y install r-base
Once R has been installed, we can now install Rstudio. First download and install the correct package for your architecture.
Run the following command to see your servers architecture:
arch
Your system is 32-bit if the output is “i686” or “i386” or it is 64-bit if the output is “x86_64”.
If you are using 64-bit Ubuntu, so execute the following commands:
  wget https://download2.rstudio.org/rstudio-server-0.99.491-amd64.deb
  sudo gdebi rstudio-server-0.99.491-amd64.deb
If you are on 32-bit Ubuntu, execute the following commands:
  wget https://download2.rstudio.org/rstudio-server-0.99.491-i386.deb
  sudo gdebi rstudio-server-0.99.491-i386.deb
Since the wget command downloaded an installation (.deb) file you can delete the file using the rm since we are done using it
rm rstudio-server-*
You can now verify the installation by running the following command:
sudo rstudio-server verify-installation
If the commands is successful and there is no output, then you have installed Rstudio, and we can move onto connecting to the Rstudio server (and jupyter notebook) using SSH Tunneling.
Connecting to the Server
Rstudio is generally running on port 8787. This means if you install the server on your local computer (running Linux), you would access it at localhost:8787 in your favourite web browser. Similarly to connect to the server you can connect to it directly navigating to http://<server-ip>:8787 in your favourite web browser. You can then log into RStudio using the your username and password for the server (or local computer).
Installing Packages and Getting Started Doing Analysis using Rstudio
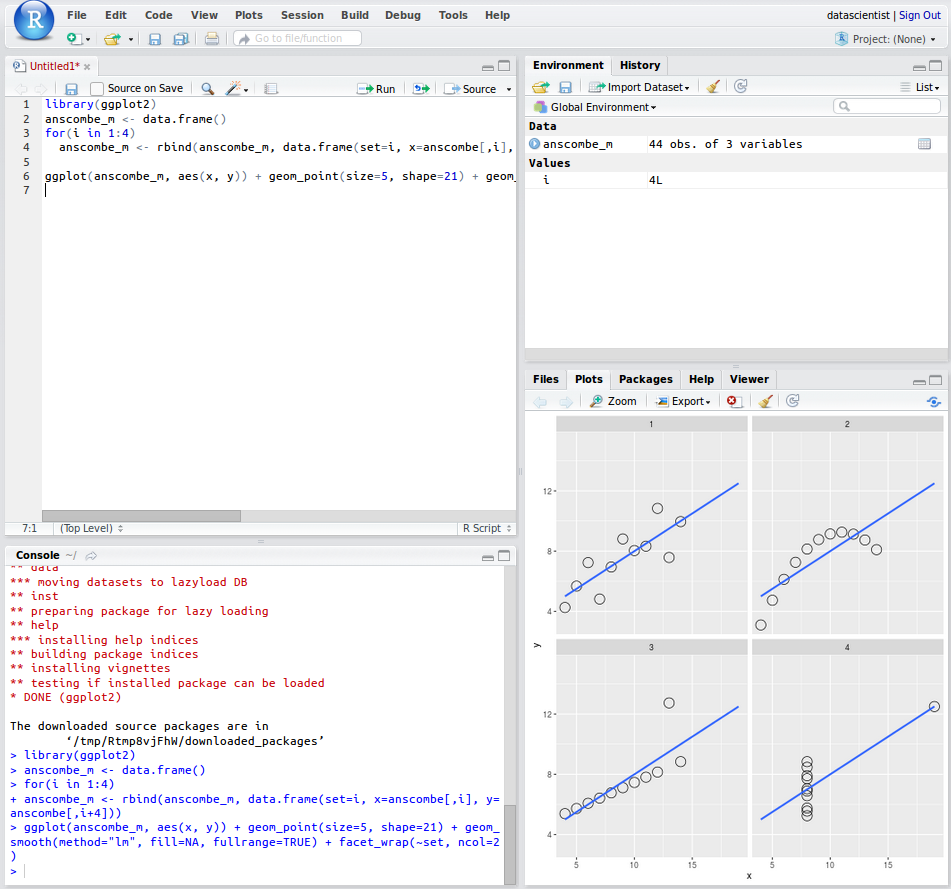
Once Rstudio is running, you can easily install packages by going to Tools > Install Packages… or using the command line at the bottom. We can install one of the most powerful plotting library called Grammar of Graphics or ggplot by typing the following command at the bottom and hitting enter
install.packages("ggplot2")
It might ask you to confirm the installation, so type y to confirm the prompts. Once the library has installed, we can now create our first R script. Go to File > New File > R script. Now type the following:
  # load the plotting library
  library(ggplot2)
  # load the ansombe data into a dataframe
  anscombe_m <- data.frame()
  # for each ansombe dataset, reshape the data and plot with linear regression
  for(i in 1:4)
    anscombe_m <- rbind(anscombe_m, data.frame(set=i, x=anscombe[,i], y=anscombe[,i+4]))
    ggplot(anscombe_m, aes(x, y)) + geom_point(size=5, shape=21) + geom_smooth(method="lm", fill=NA, fullrange=TRUE) + facet_wrap(~set, ncol=2)
Now you can click Run and you have officially made your first series of plots and analysis in R! The output should look like the following
Next let us learn how to transfer data between your local computer and the server.
Securely Transferring Files with a Remote Server
In this section we will learn how to transfer files using SSH. First we will send a data file from our local computer to the server, next we will build a simple model and output the results into a new data file and transfer it back to our local computer.
Using Filezilla (Windows, Linux and Mac)
The Digital Ocean Community page has a great guide with the theory behind on how to How To Use Filezilla to Transfer and Manage Files Securely Filezilla is an opensourced graphical user interface which enables you to send files using different network protocols.
After you download and install the filezilla client, you can connect to it by typing in sftp://<server-ip>:8787 into the Host on the top right, and then the username and password on the server and port 22. 22 is the default port for SSH. Once you have entered the details, you can click quickconnect, and it will connect to the server. One the left hand side you will access to your local files, and on right hand side you will access to the servers. You can now drag and drop files between your local computer and the server.
Note, if you are using the csclub server, since they have a shared file system you have to transfer files by connecting to csclub.uwaterloo.ca. An example of a connection between the csclub server and my local computer using Filezilla is shown below:
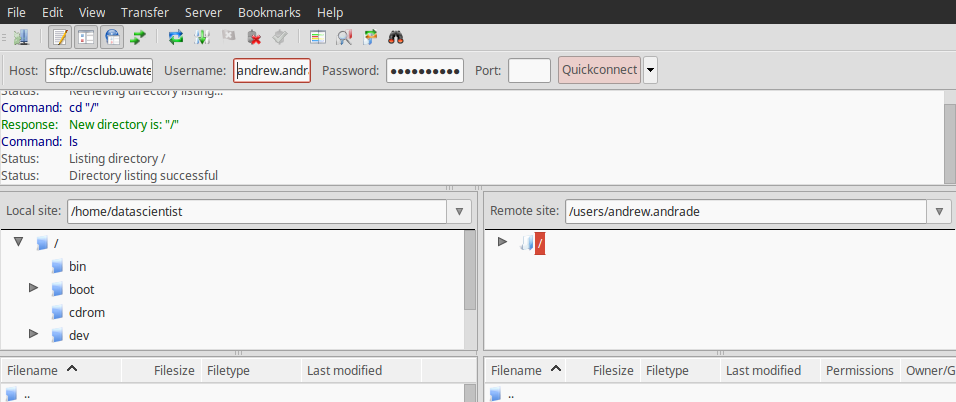
The host name is sftp://csclub.uwaterloo.ca and the username and password is my csclub account. If you are use an SSH key, you can follow the Digital Ocean guide on How To Use Filezilla to Transfer and Manage Files Securely
Linux and Mac Only
The Digital Ocean Community page has a great guide with the theory behind how to securely transfer files with a remote server, this guide will just summarize the sets and show an example of sending a file from your local computer to a server, doing analysis on the server and then sending the updated file back to your local computer.
First let us download one dataset from the ansombe quartet. We should save the file to a known location such as our downloads folder (~/Downloads)
Now let us connect to the server using sftp:
sftp username@remote_hostname_or_IP
File Transfer Protocol (FTP) is a very popular method for transferring files but can be unsecure. SSH File Transfer Protocol, or Secure File Transfer Protocol (SFTP) is a separate protocol packaged with SSH that works in a similar way over a secure connection. In our example with the csclub corn-syrup server, with andrew.andrade as the username, we can connect using the following command in Linux:
sftp andrew.andrade@corn-syrup.uwaterloo.ca
We can now send files from our local computer to the remote server using the put command
put Downloads/anscombe_i.csv
The file has now been successfully transfered to the server!
We can also transfer the file back to our local computer using the get command
get anscombe_i.csv
Notice how the anscombe_i.csv now appears in the home directory of our local machine. We now were successfully able to transfer files between the server and the our local computer!
You can now start doing your own analysis using the server in both Python and R.